Uvily Light
A well-lit pool should feel inviting, not overexposed. So, what is the best way to light up a pool area? The answer depends on safety, water reflection, energy use, and evening comfort. A single bright floodlight often creates harsh glare, dark corners, and distracting reflections on wet surfaces. Layered lighting works better. Combine underwater fixtures, low pathway lights, wall illumination, and carefully aimed accent lights. Keep steps and deck edges visibly defined. Avoid placing powerful lamps directly across from seating areas.
Industry research supports this balanced approach. The U.S. Department of Energy’s Energy Savings Forecast of Solid-State Lighting in General Illumination Applications identifies LED technology as a major route to lower lighting energy consumption. ENERGY STAR also reports that certified LED products use substantially less energy and last longer than traditional incandescent lamps. These benefits matter around pools, where lights may operate for several hours each evening. However, efficiency alone does not guarantee good design. Brightness can still be excessive.
Lighting designer Richard Kelly described three essential qualities: “focal glow, ambient luminescence, and play of brilliants.” His principle remains useful beside modern pools. Let the water shimmer softly. Give seating areas a gentle glow. Add controlled highlights to trees, tiles, or architectural details. Use properly rated outdoor equipment, sealed connections, and professional installation. Small mistakes matter near water. This guide examines seven practical lighting methods, while recognizing that no single layout suits every pool, climate, or budget. The most attractive result may require testing, adjustment, and a little restraint.
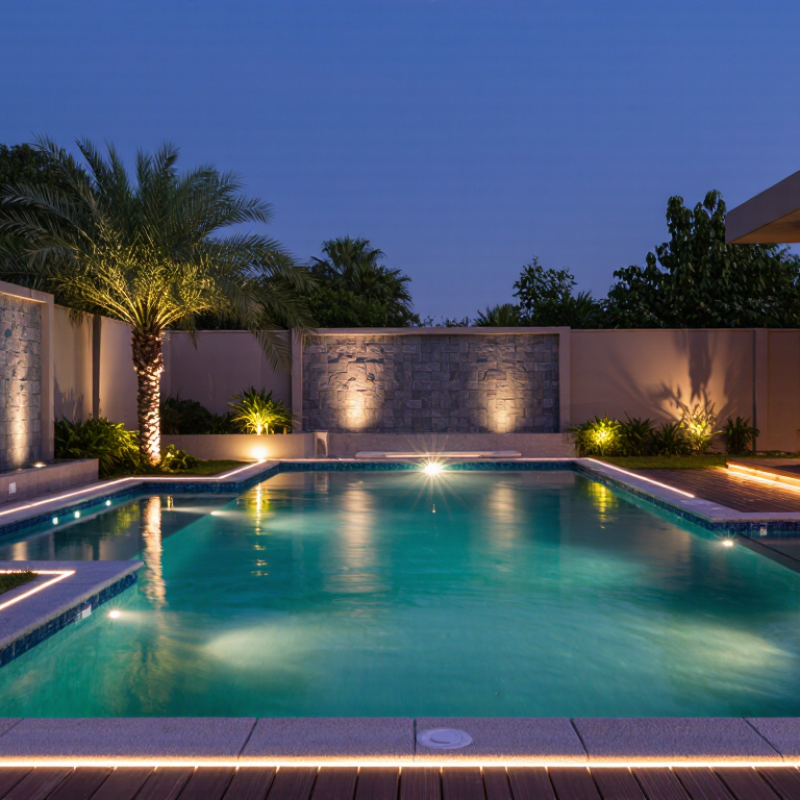
Before choosing fixtures, assess how the pool area is used after sunset. Walk around the deck, steps, seating, and nearby planting areas. Note dark corners, reflective surfaces, and places where wet feet may create hazards. Measure the pool’s shape and identify viewing points from the house. Notice existing light spill.
Ask what the lighting must accomplish. Safe movement may require gentle light along steps and paths. Swimming needs clear water visibility without harsh glare. Entertaining may call for softer illumination around chairs and dining areas. A bright pool can still feel uncomfortable if nearby seating remains shadowed. Keep the water calm.
My first assessment missed the effect of pale tiles on glare. I focused on brightness and ignored how reflections reached the windows. That mistake taught me to view the pool from several heights and angles. Leave room for adjustment. Use layered lighting, with separate controls for paths, water, and relaxation zones. An experienced electrician should verify suitable outdoor ratings, wiring protection, and local requirements. Avoid placing lights where swimmers face the beam directly. Document the intended brightness and control locations before installation. This record helps prevent random additions later, though real conditions may still require changes.
7 Best Ways to Light Up a Pool Area?
Use Underwater Lights to Add Depth and Visual Focus
Underwater lights can make a pool feel deeper, calmer, and more inviting after sunset. Place fixtures along the walls, steps, and swim zones, rather than aiming every beam toward the house. This creates layered depth and reduces harsh reflections on the water. Cool white light gives crisp visibility, while warmer tones create a softer residential atmosphere. Keep it restrained.
The U.S. Department of Energy’s Energy Saver guidance reports that LED lighting uses at least 75% less energy than incandescent lighting and can last up to 25 times longer. That efficiency matters when pool lights operate for several hours each evening. Select equipment rated specifically for submerged use, and follow the 2023 National Electrical Code requirements for bonding, grounding, and ground-fault protection. A licensed electrician should verify the installation.
Brightness is not always better. Excessive light can flatten the water’s appearance and disturb nearby rooms. In practice, light placement often matters more than wattage. Test the effect at night before final installation, because pale finishes reflect dramatically. I would also question automatic schedules that run until morning. They waste energy and reduce the quiet character of the space. Depth matters. A few carefully positioned lights can outperform a crowded layout.
7 Best Ways to Light Up a Pool Area?
Safe pool lighting begins with movement, not decoration. Place low, shielded fixtures along paths so wet surfaces remain visible without harsh glare. Add recessed or surface-mounted lights at every step, especially where depth changes are difficult to judge. Illuminate handrails and gates from the side, rather than shining light into approaching eyes. Seating areas need soft, warm illumination around chair legs, tables, and drink surfaces. Keep the pool edge readable, but avoid bright reflections that hide its outline.
Tips: Test the layout after sunset. Walk barefoot, slowly and carefully, then check each shadow. Use outdoor-rated equipment, protected connections, and a qualified electrician who understands local safety requirements. Separate controls for paths, steps, and seating make adjustments easier. Motion sensors can help on access routes, though they may react too slowly near water. That detail is easy to miss.
For a practical seven-part plan, combine path lights, step lights, rail lighting, gate lighting, seat-level fixtures, table lighting, and gentle perimeter illumination. Mount fixtures away from splash zones when possible, and aim beams downward. Avoid placing lights directly behind swimmers or beside eye level. I once planned a seating corner that looked elegant in daylight, but its shadows made the steps unclear at night. The design needed more light, not more decoration. Review the area from a child’s height and from the wettest walking route. Some layouts still need adjustment after installation.
Recommended target illuminance levels for safer movement and comfortable outdoor use. Higher lux values indicate brighter lighting needs.
Use low-glare, weather-resistant fixtures and avoid directing light into swimmers’ eyes. The values shown are practical design targets rather than universal code requirements; local regulations should always be checked.
7 Best Ways to Light Up a Pool Area?
Create Atmosphere with Accent, String, and Landscape Lighting
A pool should feel inviting after sunset, not brightly exposed. Start with soft underwater lights that reveal steps and water movement without creating glare. Add path lighting along walkways, especially where wet feet may travel. Low, shielded fixtures provide guidance while protecting nearby windows from harsh reflections. I prefer warm white light for seating areas because it makes skin tones and stone surfaces feel comfortable.
Accent lighting can shape the entire space. Aim narrow beams at palms, textured walls, planters, or architectural details. Keep the fixtures hidden behind foliage when possible. String lighting above a lounge deck adds a relaxed, intimate atmosphere. Leave small gaps between strands, or the ceiling may look cluttered. It happens. Use dimmers to adjust brightness for swimming, dining, or quiet conversations.
Landscape lighting should layer the scene instead of flattening it. Place gentle uplights behind shrubs, and use compact step lights near changes in level. Floating lights can add movement, but they should never obstruct swimmers or pool equipment. Choose outdoor-rated fixtures, sealed connections, and corrosion-resistant materials. A qualified electrician should inspect every connection near water. I once underestimated how quickly glare travels across a dark yard. Testing lights after sunset, from several seating positions, often reveals problems that daytime planning misses. Don’t skip that test.
7 Best Ways to Light Up a Pool Area?
A safe pool lighting plan starts with weather-resistant equipment. Choose fixtures rated for outdoor exposure, and check their IP rating before purchase. Weather-resistant does not always mean waterproof. Use warm, low-glare LEDs around paths, seating areas, and pool edges. They improve visibility without making the water look harsh. Recessed step lights can mark changes in height, while wall-mounted fixtures add comfortable background light. Keep each light away from swimmers’ direct eye level.
Submerged lights create a dramatic effect, but they require specialist installation and careful bonding. Use only fixtures designed for pool immersion. A qualified electrician should inspect circuits, grounding, and residual-current protection before use. Low-voltage landscape lighting is often practical around the deck, yet its transformer still needs a dry, ventilated location. Never hide connections beneath wet soil or loose paving. Small details matter.
Aim uplights at palms, stone walls, or textured surfaces for depth. Solar fixtures may help in remote corners, although cloudy weather can reduce their output. Test the layout at night before permanently fixing everything. I once underestimated glare from a polished tile, and the reflection made one seating area uncomfortable. Maintenance is equally important: clean lenses, remove leaves, inspect cracked seals, and tighten loose fittings each season. Replace damaged cables promptly. A beautiful installation can still fail when drainage is poor or maintenance becomes an afterthought.
| Lighting Method | Best Use | Recommended Fixture and Protection | Typical Light Color | Installation Guidance | Maintenance Requirements | Key Safety Consideration |
|---|---|---|---|---|---|---|
| 1. Underwater Pool Lights | Illuminating the pool basin, steps, and entry points for safer nighttime swimming. | Low-voltage, pool-rated submersible fixtures with an IP68 enclosure rating or the local equivalent. | Warm white to neutral white, approximately 2700–4000 K. | Position lights to reduce glare toward the house and main viewing areas. Use a qualified electrician for transformer, bonding, grounding, and wiring work. | Clean the lens periodically, inspect seals and cable entries, and replace damaged or cloudy covers promptly. | Use only fixtures specifically approved for underwater pool installation; ordinary outdoor lights are not suitable. |
| 2. Pool-Edge and Coping Lights | Defining the pool perimeter, coping, shallow ledges, and walking edges. | Sealed linear or compact outdoor fixtures rated at least IP65; use IP67 where temporary water immersion is possible. | Warm white, approximately 2700–3000 K, to reduce harsh reflections. | Install evenly spaced fixtures below direct eye level and angle them toward the deck or coping rather than across the water. | Remove leaves and debris, check mounting hardware, and inspect cable insulation after severe weather. | Avoid creating dark gaps or bright points that could make changes in level difficult to see. |
| 3. Pathway and Step Lighting | Lighting routes between the pool, patio, changing area, outdoor kitchen, and seating zones. | Shielded bollards, recessed step lights, or low-profile fixtures with IP65 or higher protection. | Warm white, approximately 2700–3000 K. | Place lights to illuminate tread surfaces without shining directly into swimmers’ or guests’ eyes. Keep fixtures clear of splash zones when possible. | Trim nearby plants, clear drain openings, clean lenses, and test photocells or timers seasonally. | Use low-voltage systems where appropriate and protect wiring from landscaping tools and foot traffic. |
| 4. Deck and Patio Downlighting | Providing broad, comfortable illumination over pool decks, dining areas, and lounge spaces. | Weather-resistant ceiling, wall, or eave-mounted fixtures rated IP65 or higher for exposed locations. | Warm white, approximately 2700–3000 K. | Mount fixtures under eaves or covered structures when possible. Use diffusers and shielding to control glare and reflections on the water. | Clean diffusers, check corrosion around fasteners, and confirm that water cannot collect around electrical housings. | Maintain required separation from the pool and follow local electrical codes for outdoor and wet locations. |
| 5. Wall-Washing and Landscape Lighting | Highlighting retaining walls, planting beds, architectural features, and the pool surroundings. | Shielded spotlights or wash lights with an IP65 rating or higher; corrosion-resistant housings are preferable near saltwater pools. | Warm white, approximately 2700–3000 K, for natural-looking landscaping. | Aim beams at walls or foliage instead of open water. Keep fixtures accessible for adjustment and avoid placing them where irrigation constantly sprays them. | Re-aim fixtures after landscaping changes, remove plant growth from lenses, and inspect for corrosion or water intrusion. | Limit brightness and glare so the lighting enhances visibility without disturbing neighbors or affecting drivers. |
| 6. Decorative String or Lantern Lighting | Adding ambient atmosphere above seating, dining, and entertainment areas outside the immediate pool edge. | Outdoor-rated, sealed fixtures and cables; use products marked for damp or wet locations according to their exposure. | Warm white, approximately 2200–2700 K. | Secure cables with proper supports, keep them away from the water, and install plug connections in weather-protected enclosures with residual-current protection. | Inspect cords, sockets, anchors, and bulbs before use and remove the system during extreme storms if it is not permanently installed. | Do not place electrical cords across walkways or allow decorative fixtures to hang within reach of swimmers. |
| 7. Solar and Motion-Activated Accent Lights | Supplementing low-traffic garden edges, remote paths, fences, and occasional-use areas. | Outdoor solar fixtures with IP65 or higher protection; motion sensors should be adjustable for range and duration. | Warm white to neutral white, approximately 2700–4000 K. | Place solar panels where they receive unobstructed daylight. Use motion activation only where sudden changes in brightness will not create glare or confusion. | Clean solar panels, replace rechargeable batteries when performance declines, and check sensor alignment and mounting stability. | Use these lights as supplementary illumination, not as the only lighting for pool entries, steps, or emergency routes. |
Place them along walls, steps, and swim zones. This creates depth and soft layers. Avoid aiming every beam toward the house.
Cool white improves visibility. Warm white feels softer around seating areas. I prefer warm light near stone and skin tones.
No. Excessive brightness can flatten the water and create harsh reflections. A few well-placed lights may work better.
Place low, shielded fixtures along walkways and level changes. They guide wet feet without shining directly into nearby windows.
Aim narrow beams at palms, textured walls, or planters. Hide fixtures behind foliage when possible. Small gaps prevent a cluttered ceiling.
Choose outdoor-rated equipment and check its IP rating. Weather-resistant does not always mean waterproof. A qualified electrician should inspect connections near water.
Submerged fixtures need specialist installation, proper bonding, grounding, and fault protection. Use equipment designed specifically for immersion. Safety comes first.
Test the lighting after sunset from several seating positions. Use dimmers and shorter schedules. I once underestimated glare from polished tile.
Clean lenses, remove leaves, inspect seals, and tighten loose fittings each season. Replace damaged cables quickly. Small details matter.
Lighting a pool area well begins with assessing the space and deciding whether the main goal is safety, relaxation, entertainment, or visual appeal. The question “what is the best way to light up a pool area” depends on how the pool and surrounding features are used. Underwater lights can add depth, highlight the water’s shape, and create an attractive focal point, while path and step lighting helps people move confidently around wet surfaces. Seating areas should also receive comfortable, glare-free illumination.
To create a welcoming atmosphere, combine accent lights, string lights, and carefully placed landscape lighting around plants, walls, and outdoor features. Choose weather-resistant fixtures designed for outdoor conditions, and ensure installation is handled safely with suitable electrical protection. Regularly clean lenses, inspect connections, replace damaged components, and adjust lighting angles as the landscape changes. A balanced plan should provide layered illumination without excessive brightness, helping the pool area feel safe, comfortable, and visually inviting after sunset.
